Wednesday, January 21, 2009

Layout

Just a peek into the space I'm setting up in.  Here is the Tippets gallery with the partitions moved into place:


Not a very good image, I know.  But just try to imagine the walls covered in black from floor to ceiling, blocking that irritating light from the mezzanine windows.

And here is a simple bird's eye view of the layout of the circle:

The central stone in the back will be the portrait.  The front two pylons will be the ones I just finished in the last post.

Stay tuned.

First 2 Finished

Over the weekend I made it a goal to finish these first two.  It took me a little longer; I finished them Monday evening.  This is a little backwards, but I'm going to post these now so you can see a finished (or close to finished) product.  Don't worry - in later posts I'll go step-by-step.  They still need a few tweaks, but you get the general idea:


After being well into the texturing process, Amber and I decided to go larger with all of them (sheesh!)  It was too late to add onto these, so we're going to make base stones for them to sit on.  Here are the backs:

I see a few problems that hopefully be resolved with subsequent pieces, and I can still mess with these a little bit.  The first thing is the color:  while there is some variation, it's not random enough.  Once you start on this process, it's too easy to become formulaic.  Put a blotch here, then there, and soon, you have an evenly spaced pattern.  You need to break things up a little, and it takes some restraint.

The other thing is the shaping.  In trying to weather the styrofoam, you can go a bit overboard and make it too rounded or puffy.  Some roundness good, but it must be broken up by hard angles.  This one I think suffered from that problem:

The last major setback is the paint quality.  I'm using acrylic, and it can become too plasticy.  I'm going to try lightly spraying it with adhesive and then dumping dirt all over it to make it look dustier.
 

I'd welcome any feedback.  Later.

Saturday, January 17, 2009

Set up

Okay, my set up.  I have two rooms, one for my drawing and one for sculpture.

There's nothing to my drawing outfit, really.  A drafting table with a repurposed Budweiser sign for a lamp, several sharpened 8B graphite pencils, a .5 mm mech pencil when needed, chamois, a kneaded and vinyl eraser, graphite powder, and a sheet of palette paper (basically waxed paper) to keep my hand from smudging.

A draw very observationally, so I use a lot of my own reference photos, National Geographic pages, and internet images for inspiration.

I know.  Very pansy.  Every professor I've had would sneer at me sitting down, my face buried in a small piece of bristol paper, drawing from photographs.  It's just so damn fun.  Here's a teaser image:


The adjacent sculpture room is basically a sink, a table for paints and grounds, and a huge pile of styrofoam:


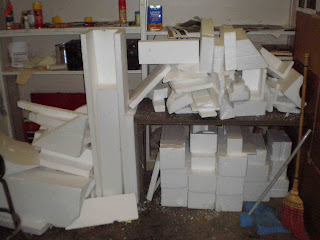
Fischer's is the only place here in Logan I can find who deals with this amount and kind of foam.  Giving the warehouse guys donuts every now and then doesn't hurt.

The only thing I found that works for gluing the styrofoam together is this stuff, a spray expansion foam:


I tape the pieces together first, then spray in the cracks to let the foam fill the spaces.  Here is an example of a built piece:

I use anything, including my bare hands, to shape the foam.  Watch for foam density:  the high-density stuff can be a bear to carve.

Next post:  shaping foam and layering the texture.

Friday, January 16, 2009

Introduction

I have decided to document the progress of my thesis project.  This would help me not only in record keeping, but also as a matter of intermittent examination.  And, because many artists are reluctant to talk about process, I thought sharing mine might be useful
for somebody, if not interesting.

Many who know me realize that I am no fan of artist statements and their ilk.  As such, I will keep the pontificating to a minimum.  Aside from today's post, where an intro is somewhat necessary, postings will mostly be images and very little text.

My interest in art has always been the intrinsic value a piece can hold as an object, rather than a vehicle for expression (yes, I understand that these distinctions can be paper-thin).  This, combined with my love of history, has governed the thought processes in the latter half of my graduate school experience - the urge to turn "art" into "artifact."  So for now, this trajectory has culminated in Monument.

A few semesters ago I began combining my drawings with a sculptural component.  Basically glorified frames, these image-slabs were variably successful, and were made of wood, plaster, and styrofoam.  Here is an example:


After finishing a string of these pieces, I wanted something larger, have more of a presence, and to be seen in the round instead of against the wall.  I also liked the notion that my pieces went beyond me - that they weren't just crap I stuck in a gallery.

Using stone circles from England and Brittany as a model, I'm creating a fictional historical site of monolithic stones, and imbedding drawings into them.  The content of the images are loosely narrative - one portrait and several objects.

I'm showing in the Tippetts gallery - not the ideal for a show like this, nut I'm going to isolate the center of the gallery with partitions and black cloth.  I want the observer to enter a separate space - not a gallery, but a historical site.  People will be able to freely roam around the slabs, moving in and out of the circle, uninterrupted by the outside gallery walls or light from the mezzanine windows.

Each slab will be constructed of styrofoam scrounged up from local furniture stores, surfaced and painted up.  I am aiming for 11 with images, plus a few more small rocks to create the environment. 

Amber Quesenberry, a BFA candidate in sculpture, is assisting me throughout this entire process.  The exhibition, March 16-20, seems a lot more attainable with her help.


Stay tuned for more posts