Shanell has started a blog for our family. Check it out.
Monday, February 23, 2009
Acknowledgements
I wanted to give a quick thanks to the other people who have put in hours of work at the studio helping me with this project: Vince, my father (who drives up from Salt Lake), and Shanell and the kids. The help was unexpected but very welcomed. I really appreciate it.
Thursday, February 19, 2009
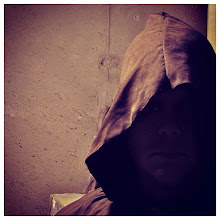
Textures
Here's some detail shots of a few recent ones.
 I think the last week I'm going to go back over them all for a few touch-ups: add a few darker values, slight color variation, maybe dust them up a little
Tuesday, February 17, 2009

Monday, February 16, 2009
About Drawing
As I've said before, the way I approach graphite drawing would make even a middle school art teacher cringe - I certainly don't teach drawing this way. But it works and I like doing it, which are the only reasons I need.
There are a few precepts of contemporary academic art I ignore:
I rarely resolve composition prior to the final drawing. In fact, I would say I scarcely think about it, I only have a vague mental picture of it. As I draw, directions start to present themselves through my source material, my medium, or something that pops into my head, and I flow with it. Do some images turn out weak? Absolutely. But I have found the ratio of good to bad comps is equal, if not better, than if design was worked out before hand. I used to fully resolve composition in several thumbnails, but found it too rigid an approach. I'm certainly not against thumbnails, and I do it myself with other work, but with this type of drawing, my method yields more fulfillment.
I don't work from general to specific. Starting from a vague mental picture as mentioned above, I quickly throw down very few lines and 1 or 2 values. I then start from the very left, and fully resolve the drawing, inch by inch, towards the right until I reach the edge. After that, I may move around the rest of the drawing for a few tweaks. Sometimes this process varies a little, but for the most part it works like an ink jet printer. I use a piece of waxed palette paper to rest my hand on, as to not smudge or smear oils into the paper.
 To some of you, the above two processes may sound contradictory. How can I be open to different directions when the image is being fully drawn left to right? Well, I probably don't have a satisfactory answer: It's that movement across the page that sparks what will happen next.
I also do a few other things that, while they may not be no-no's, are certainly unpopular in the contemporary art world. I work small, realistically and fairly detailed, much of it from photographs. Mostly my subject matter is chosen for its coolness factor, not for any deeper meaning. I'm also myopic in my observation, and enjoy surface details. Usually, if I am drawing from life, it's no more than a foot or two in front of my face. I've rigged a small shelf right to my desk to set small still lifes up on, directly above where I draw:

Lastly, there is something nostalgically comfortable about graphite on white paper. As with many kids, I spent much of my homework time drawing dragons, swords, and robots with my #2 writing pencil; I feel that this way of drawing is in part a return to that.

Lastly, there is something nostalgically comfortable about graphite on white paper. As with many kids, I spent much of my homework time drawing dragons, swords, and robots with my #2 writing pencil; I feel that this way of drawing is in part a return to that.
Thursday, February 12, 2009
Photo shoot
With the help of Morgan Post, a photo grad student, I dragged these two new ones down into the photo studio and shot them.


They look pretty good in the photo's, I think the last one I laid on the texture a little too much and too high contrast. I'll talk more about that in the post about painting them up.
The photo's in this shoot will be used to make the postcard, being designed by my friend Geoff Shupe.
Sunday, February 1, 2009
Shaping and surface prep
I talked briefly about assembly 2 posts ago. As I mentioned, I build the markers first just with masking tape to the desired shape, then I spray "Great Stuff" expansion foam in between the pieces. It's much faster than spraying as you build, plus the adhesive works better when it expands to fill the cracks. Here is another pic of a built one:

Next is the shaping. Be warned; this step is unavoidably messy. The foam pellets get everywhere, are light as air so are hard to sweep and vacuum, and have static cling.
I know there are cutting tools you can buy, such as heated metal cords that cut through foam, but I've just been using a serrated knife and stiff-backed saw, putty knives, and my hands to shape it.


 Setting the image in is a tricky business. I mount my drawing to a panel with a glue stick (this is the best adhesive for the job I've used - it's dry, won't wrinkle the paper, and it applies easily). I then just push the image into place and mask it off once, overlap with cement patch, and immediately remove the mask so the patch doesn't dry with the tape under it. I mask it again, texture the cement, and it's ready for paint.
  Don't make the mistake I did here; whenever masking an image, use delicate adhesive blue painter's masking tape.

I try to resolve shape as as possible to the desired final product. In fact, I keep this attitude through each step. I've observed as an artist that it is never a good idea to leave a step unresolved to be corrected later. When "later" comes, I find myself in repair mode, and the piece never gets to where I want it.
After shaping is finished, I measure out a space for the image and cut into it. I then do a quick layer of cheap latex paint over the whole thing. You can buy mismatched gallons from Home Depot for five bucks. This strengthens the surface for the texturing, binding all those foam pellets together so it's not a mess later.
For the texturing, I've found this acrylic-based concrete patch to work best:

It's stiff, gritty, and dries to a very strong, flexible surface. You can mix it with a little water to change up surface quality; you can even add pigment. It has that coarse, stony feel to it when it dries.
For this process, we wear latex gloves and hand-apply it, which I found works best. Once on, you can go back into and texture it using cloth, sponges, brushes or whatever you want. It dries relatively quickly, so I do this every square foot or so during application. Here's Amber in the process:
 Setting the image in is a tricky business. I mount my drawing to a panel with a glue stick (this is the best adhesive for the job I've used - it's dry, won't wrinkle the paper, and it applies easily). I then just push the image into place and mask it off once, overlap with cement patch, and immediately remove the mask so the patch doesn't dry with the tape under it. I mask it again, texture the cement, and it's ready for paint.
 Don't make the mistake I did here; whenever masking an image, use delicate adhesive blue painter's masking tape.
Next step: painting.
Subscribe to:
Posts (Atom)